Fitting Roof Tiles Around Velux

Fixing Installing Lightweight Roofing Velux Detailing Youtube Velux Installation Roofing

Velux New Generation Roof Window Standard Installation Into Tile Youtube Velux Velux Windows Installation Velux Windows

Tiled Conservatory Roof Plus Velux Conservatory Roof Tiled Conservatory Roof Roofing Options

Plain Tile Flashing Kfp Installation Youtube

Metal Roof With Velux Window Metal Roof Panels Aluminum Roof Panels Metal Roof Installation

Installing A Skylight In A Metal Roof Home Roof Ideas Roof Skylight Fibreglass Roof Skylight Installation
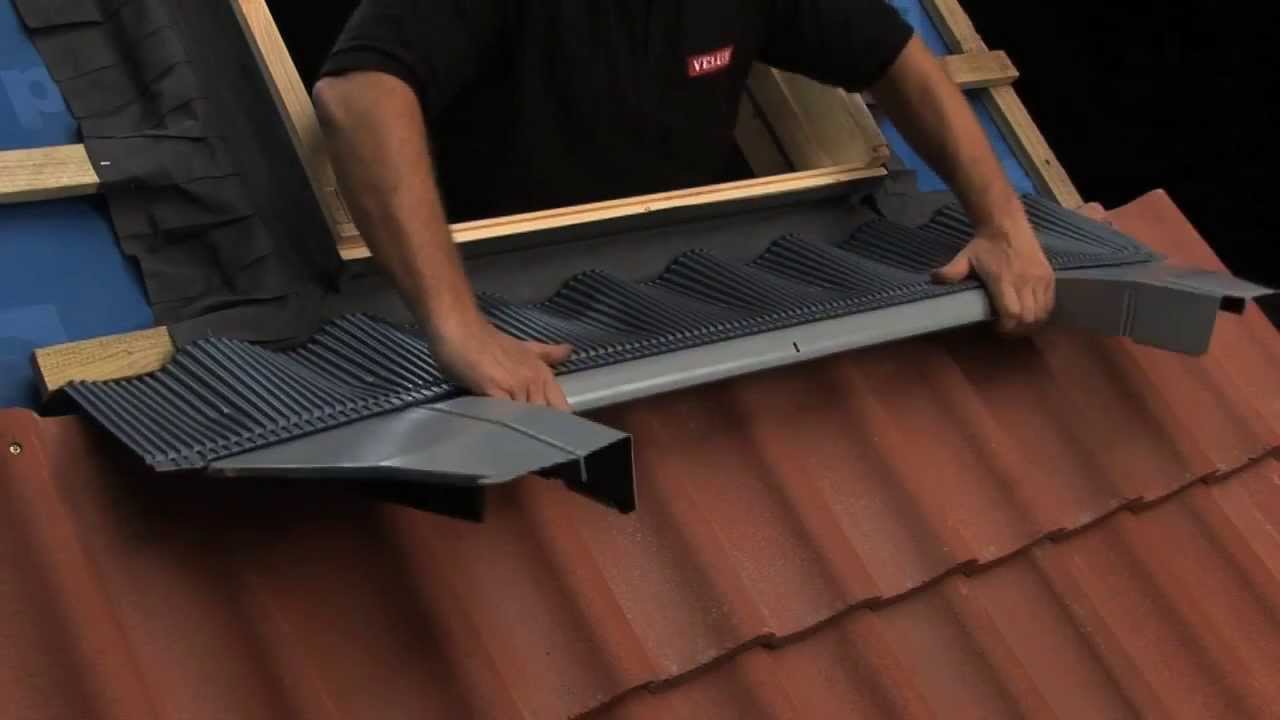
You are now ready to fit your flashing.
Fitting roof tiles around velux.

Zinc Roof Velux Google Search Zinc Roof Metal Roof Metal Roofing Prices

Keylight Insulated Loft Ladder Google Search Diy Skylight Velux Skylights Skylight

Individual Housing East London Zinc Roof Standing Seam Standing Seam Roof

Pin On Velux

Click To Enlarge Velux Roof Light Light Tunnel

Pin On Massachusetts

13 Irresistible Roofing Styles Shed Ideas In 2020 Roof Light Skylight Roof Window

Velux Skylights Install With Owens Corning Summer Harvest Shingles Velux Skylights Shingling Roof Shingles

One Room Challenge Week 3 Let There Be Light Installing Our Velux Solar Powered Fresh Air Skylight Skylight Installation Skylight House Design

Pin On Solar Panel Easy Installation

Velux Windows Next Day Delivery Sterlingbuild Flat Roof Skylights Flat Roof Lights Flat Roof
Velux New Generation Roof Window Standard Installation Into Tile Youtube

Velux Sun Tunnel Google Search With Images Velux Light Tunnel Ceiling Diffuser

Pin On How To Videos

Slate Roofing Job With Velux Windows By J Building Roofing Make Your Home Design Dreams Come True Read Reviews Of 1000s Velux Windows Roofing Roofing Jobs

Image Result For Roof Window Balcony Roof Window Velux Velux Skylights

Velux Edw Flashing Installation Youtube

Easy Skylight In A Roof Fit A Velux Or Install A Roof Window Any Brand Roof Window Bungalow Skylight
Https Encrypted Tbn0 Gstatic Com Images Q Tbn 3aand9gcry7o4mvvsz8ebufveik4vs39atetfpcgwtwhpr4nmsdwxhugn9 Usqp Cau

Velux Ggl Sd5p2 Conservation Centre Pivot Roof Window For Plain Tiles Up To 14mm Thick Home Slate Roof Roof Window Roof Skylight

Image Result For Are Skylights Good In Kitchens In 2020 Skylight Kitchen Velux Skylights Kitchen Skylight

Skylights In Metal Roof Fibreglass Roof Metal Roof Aluminum Roof

Velux Room Gallery Be Inspired Today Skylight Design Modern Skylights Flat Roof Skylights

Supalite Roofing A Fantastic Light Weight Solution Offering A Solid Tiled Effect Roofing Option To Y Conservatory Roof Tiled Conservatory Roof Roofing Options
Source : pinterest.com
